Test Plan for the svah project
v0.5.2.86
Table of Contents
- 1. Introduction
- 2. Test Environment
- 3. Unit Tests
- 3.1. UT-01 — CanopenSimple: message identifier encoding
- 3.2. UT-02 — CanopenSimple: Set Input Position encoding
- 3.3. UT-03 — CanopenSimple: Set Input Velocity encoding
- 3.4. UT-04 — CanopenSimple: Set Axis State encoding
- 3.5. UT-05 — CanopenSimple: Heartbeat decode
- 3.6. UT-06 — CanopenSimple: Encoder estimates decode
- 3.7. UT-07 — CanopenSimple: Iq, Temperature, Bus voltage decode
- 3.8. UT-08 — HalTime: monotonicity
- 3.9. UT-09 — OdriveApi: axis initialisation
- 3.10. UT-10 — OdriveApi: frame dispatch via OdriveProcessFrame
- 4. Integration Tests (vcan0)
- 4.1. IT-01 — HalCanLinux: open / transmit / receive / close
- 4.2. IT-02 — HalCanLinux: ring buffer overflow
- 4.3. IT-03 — HalCanLinux: callback mode
- 4.4. IT-04 — OdriveApi: state transition simulation
- 4.5. IT-05 — OdriveApi: timeout detection
- 4.6. IT-06 — svah executable: IDLE transition with thread simulator
- 4.7. IT-07 — svah executable: unknown interface exit
- 4.8. IT-08 — svahsim executable: play-mode script
- 4.9. IT-09 — svahsim + svah: two-process end-to-end validation
- 4.10. ODrive S1 — first-time CAN configuration
- 4.11. ST-01 — ODrive S1: heartbeat reception
- 4.12. ST-02 — ODrive S1: IDLE state transition
- 4.13. ST-03 — State transition: closed-loop control
- 4.14. ST-04 — DBC cross-validation (future)
- 5. Test Infrastructure
- 6. Physical Integration Tests (two-node CAN bus)
- 6.1. Hardware configuration
- 6.2. Wiring diagram
- 6.3. RPi 4 with Waveshare RS485 CAN HAT (B) setup
- 6.4. Setup procedure for x86 hosts
- 6.5. PI-01 — Two-host svahsim / svah: IDLE transition
- 6.6. PI-02 — Two-host timing: watchdog feed
- 6.7. PI-03 — Heterogeneous platform: x86 ↔ ARM (Raspberry Pi)
- 6.8. PI-04 — Error injection: svahsim injects axis error
- 6.9. PI-05 — Bus disruption: cable disconnect during operation
- 6.10. PI-06 — Bitrate mismatch detection
- 7. Test Infrastructure Details
- 8. Glossary
List of Figures
- Figure 1 DSD TECH SH-C31A — bornes L (CANL), C (GND), H (CANH) et switches blancs (JP1)
- Figure 1 DSD TECH SH-C31A — bornes L (CANL), C (GND), H (CANH) et switches blancs (JP1)
- Figure 2 ODrive USB-CAN Adapter — bloc 4 bornes (GND/CANH/CANL/shield) et switch noir de terminaison
- Figure 3 Waveshare RS485 CAN HAT (B) on RPi 4 — CAN0 terminal block, 120R termination jumper, and wiring
1. Introduction
This document defines the test plan for libsvah and the svah
program. Tests are organised in three levels:
- Unit tests
- exercise individual functions in isolation, with no hardware or kernel module required.
- Integration tests
- exercise the full Linux HAL stack using
the
vcan0virtual CAN interface (requires thevcankernel module; no physical hardware). - System tests
- exercise the complete stack against a real ODrive motor controller (requires hardware).
The test suite is run with make check. Unit and integration tests
are automated. System tests are manual.
The plan is extended as new functionality is added.
2. Test Environment
2.1. Prerequisites — unit tests
- Any Linux host with GCC
- No special kernel modules
- No hardware
2.2. Prerequisites — integration tests
sudo modprobe vcan
sudo ip link add dev vcan0 type vcan
sudo ip link set up vcan0
The test suite checks for vcan0 and skips integration tests
gracefully if the interface is absent.
2.3. Prerequisites — system tests
- ODrive motor controller (v3.6 or Pro)
- CAN transceiver connected to a Linux SocketCAN interface
- Motor mechanically free to rotate (calibration sequence)
- ODrive configured:
node_id, bitrate, motor type
3. Unit Tests
3.1. UT-01 — CanopenSimple: message identifier encoding
- File
TestCanopenSimple.c- Function under test
CansimpMakeId,CansimpParseId- Method
- construct known (
axis_id,cmd_id) pairs; verify the 11-bit identifier; parse it back and verify round-trip. - Cases
axis_idcmd_idExpected msg_id 0 HEARTBEAT (0x001) 0x001 0 SET_INPUT_POS(0x00C) 0x00C 1 HEARTBEAT 0x021 3 SET_AXIS_STATE(0x7) 0x067 62 HEARTBEAT 0x7C1 - Pass criterion
- all round-trips exact; no assertion failures.
3.2. UT-02 — CanopenSimple: Set Input Position encoding
- Function
CansimpEncodeSetInputPos- Method
- encode known values; inspect payload bytes directly.
- Cases
input_pos vel_ff torque_ff Expected payload (hex, LE) 0.0f 0 0 00 00 00 00 00 00 00 00 1.0f 0 0 00 00 80 3F 00 00 00 00 -1.0f 100 50 00 00 80 BF 64 00 32 00 - Pass criterion
- byte-exact match with expected payload;
DLC = 8;
isExtended= 0;isRemote= 0.
3.3. UT-03 — CanopenSimple: Set Input Velocity encoding
- Function
CansimpEncodeSetInputVel- Method
- encode known values; verify payload.
- Cases
vel torque_ff Expected payload bytes 0..7 0.0f 0.0f all zeros 10.0f 0.0f 0x41200000 at [0..3] - Pass criterion
- byte-exact payload; DLC = 8.
3.4. UT-04 — CanopenSimple: Set Axis State encoding
- Function
CansimpEncodeSetAxisState- Cases
State Expected payload [0..3] AXIS_STATE_IDLE (1) 01 00 00 00 AXIS_STATE_CLOSED_LOOP(8) 08 00 00 00 - Pass criterion
- byte-exact; DLC (Data Length Code) = 4. The DLC is the 4-bit CAN frame field indicating the number of payload bytes (0..8). See Glossary.
3.5. UT-05 — CanopenSimple: Heartbeat decode
- Function
CansimpDecodeHeartbeat- Method
- construct raw
HalCanFramewith known payload; decode; verify output fields. - Cases
Payload (hex) axis_error state proc_result traj_done 00000000 01 00 00 0 IDLE 0 0 00000000 08 00 01 0 CL 0 1 01000000 01 04 00 1 IDLE 4 0 - Error cases
- NULL frame → -1; DLC < 6 → -1; wrong
cmd_id→ -1. - Pass criterion
- all fields exact; error cases return -1.
3.6. UT-06 — CanopenSimple: Encoder estimates decode
- Function
CansimpDecodeEncoderEstimates- Method
- build frame with known float payload; decode and
compare with
fabsf(result - expected) < 1e-6f. - Cases
pos_estimate vel_estimate 0.0f 0.0f 1.5f -2.0f 100.0f 50.25f - Pass criterion
- float comparison within tolerance; error on
wrong
cmd_idor short DLC.
3.7. UT-07 — CanopenSimple: Iq, Temperature, Bus voltage decode
- Functions
CansimpDecodeIq,CansimpDecodeTemperature,CansimpDecodeBusVoltageCurrent- Method
- same as UT-06, with the corresponding
cmd_idsand field meanings. - Pass criterion
- float round-trip within 1e-6; wrong
cmd_idreturns -1.
3.8. UT-08 — HalTime: monotonicity
- File
TestHalTime.c- Functions
HalTimeMs,HalTimeUs- Method
- call each function twice with a
nanosleepdelay of 10 ms between calls; verifyt2 >= t1and(t2 - t1)is within [5, 50] ms. - Pass criterion
- monotonicity holds; difference in expected range.
3.9. UT-09 — OdriveApi: axis initialisation
- File
TestOdriveApi.c- Function
OdriveAxisInit- Method
- pass NULL pointers; verify
ODRIVE_ERR_PARAM. Pass valid (mock) handle; verify all fields zero-initialised and axisId set correctly. - Pass criterion
- return codes and field values as expected.
3.10. UT-10 — OdriveApi: frame dispatch via OdriveProcessFrame
- Function
OdriveProcessFrame- Method
- construct synthetic frames for each handled
cmd_id; callOdriveProcessFrame; verify the correspondingOdriveAxisfields are updated. Also verify frames for a differentaxis_idreturn 1 (ignored). - Pass criterion
- field updates correct; ignored frames return 1; malformed frames return -1.
4. Integration Tests (vcan0)
All tests in this section require vcan0 to be active.
See Permanent vcan0 setup in the Test Infrastructure
Details section for how to create the interface.
4.1. IT-01 — HalCanLinux: open / transmit / receive / close
- Requires
vcan0interface up- Method
- Open two handles on
vcan0(sender and receiver). - Enable
CAN_RAW_RECV_OWN_MSGSon sender so it receives its own frames (loopback, usingsetsockopt). - Transmit a known frame on the sender handle.
- Receive on the sender (loopback) and on the receiver handle.
- Verify frame contents match exactly.
- Close both handles.
- Open two handles on
- Pass criterion
- transmitted frame received intact on both sides; no error return codes.
4.2. IT-02 — HalCanLinux: ring buffer overflow
- Method
- transmit
HAL_CAN_RX_BUFFER_SIZE + 4frames on a loopback socket without callingHalCanReceive; then drain the buffer. Verify that exactlyHAL_CAN_RX_BUFFER_SIZEframes are returned (oldest dropped, warning on stderr). - Pass criterion
- buffer returns exactly buffer-size frames; overflow is not fatal.
4.3. IT-03 — HalCanLinux: callback mode
- Method
- register a callback that increments a counter and
stores the last frame; transmit 5 frames; call
HalCanReceiveonce (should returnHAL_CAN_NO_FRAMEsince callback consumed them); verify counter = 5 and last frame matches. - Pass criterion
- callback invoked for each frame; polling returns no frame after callback consumption.
4.4. IT-04 — OdriveApi: state transition simulation
- Method
- Open
vcan0; initialise anOdriveAxis. - In a separate thread, listen for a
Set_Axis_Stateframe and respond with a synthetic Heartbeat confirming the new state. - Call
OdriveSetAxisState(AXIS_STATE_IDLE, 500)from the main thread. - Verify the function returns
ODRIVE_OKandaxis.lastStateequalsAXIS_STATE_IDLE.
- Open
- Pass criterion
- state transition completes within timeout; axis state updated.
4.5. IT-05 — OdriveApi: timeout detection
- Method
- call
OdriveSetAxisStatewith a 100 ms timeout but inject no heartbeat response. Verify the function returnsODRIVE_ERR_TIMEOUTwithin 150 ms. - Pass criterion
- timeout returned; elapsed time within acceptable bounds.
4.6. IT-06 — svah executable: IDLE transition with thread simulator
- Requires
vcan0up (see vcan0 setup);./svahbuilt.- Source
TestSvah.c, functionTestSvahNoMotion.- Method
- Open a raw SocketCAN socket on
vcan0in a POSIX thread (minimal simulator). - The thread listens for a
Set_Axis_Stateframe and responds with a synthetic Heartbeat confirming the requested state. - Fork
svah --interface vcan0 --axis 0 --no-motion --quiet. - Collect exit status of svah and simulator thread.
- Open a raw SocketCAN socket on
- Pass criterion
- svah exits 0; simulator received
Set_Axis_Stateframe.
4.7. IT-07 — svah executable: unknown interface exit
- Requires
- none.
- Source
TestSvah.c, functionTestSvahBadInterface.- Method
- run
svah --interface nonexistent99 --no-motion. - Pass criterion
- svah exits non-zero.
4.8. IT-08 — svahsim executable: play-mode script
- Requires
vcan0up (see vcan0 setup);./svahsimbuilt.- Source
TestSvahSim.c, functionTestSvahSimPlayMode.- Method
- Write a minimal play-mode
.svsscript (noEXPECTdirectives) to a temporary file. - Run
svahsim --interface vcan0 <script>. - Verify exit status 0.
- Write a minimal play-mode
- Pass criterion
- svahsim exits 0 after all
ATevents fire.
4.9. IT-09 — svahsim + svah: two-process end-to-end validation
- Requires
vcan0up (see vcan0 setup);./svahand./svahsimbuilt.- Objective
- validate the full stack (HalCan → CanopenSimple → OdriveApi → svah) against the ODrive simulator, without physical hardware.
- Source
TestSvahSim.c, functionTestSvahSimWithSvah.- Method
- Launch
svahsimas background with a script that declares anON SET_AXIS_STATE DO CONFIRM_STATE DELAY 30rule and severalATheartbeat events. - After 50 ms, launch
svah --interface vcan0 --no-motion --quiet. - Collect exit status of both processes.
- Launch
- Pass criterion
- both processes exit 0.
- Sequence diagram
- see Two-Process Test Architecture in
SimScriptLanguage.org.
:ID: ST-01 :CUSTOM_ID: ST-01
4.10. ODrive S1 — first-time CAN configuration
Before running any system test, the ODrive S1 must be configured for
CAN via odrivetool. This is a one-time procedure; the configuration
is saved to non-volatile memory on the ODrive.
4.10.1. Prerequisites
- ODrive S1 connected via USB-C to the host PC
Python and
odrivetoolinstalled:pip install odrive
- ODrive S1 powered (24 V DC)
4.10.2. Procedure
odrivetool
In the odrivetool interactive shell:
# Set CAN node ID (must match --axis argument in svah)
odrv0.axis0.config.can.node_id = 0

# Set CAN bitrate (must match ip link set bitrate on the host)
odrv0.can.config.baud_rate = 250000

# Enable CAN protocol
odrv0.can.config.protocol = Protocol.SIMPLE

# Save and reboot
odrv0.save_configuration()
The ODrive reboots automatically after save_configuration().
4.10.3. CAN termination
The ODrive S1 has a software-configurable 120 Ω termination resistor. Enable it if the ODrive is at one end of the bus:
odrv0.can.config.enable_can_termination_resistor = True
odrv0.save_configuration()
For a two-node bus (ODrive + USB-CAN adapter), both ends must be terminated. The ODrive USB-CAN Adapter has a hardware switch.
4.10.4. CAN connector
The ODrive S1 uses a JST-GH 4-pin connector for CAN. (Both the ODrive S1 and the ODrive Micro use JST-GH 4-pin for the CAN bus, not JST-PH — verify the mating connector when sourcing cables.) Pin assignment (left to right with connector facing up):
| Pin | Signal | Wire colour (typical) |
|---|---|---|
| 1 | GND | black |
| 2 | CAN_H | red |
| 3 | CAN_L | blue |
| 4 | GND | black |
Two wiring options are supported:
Option A — JST-GH cable to screw terminal adapter: Use a JST-GH4 to bare wire cable; connect CANH, CANL, GND to the screw terminal block of the USB-CAN adapter.
Option B — JST-GH cable to ODrive USB-CAN Adapter directly: If the ODrive USB-CAN Adapter provides a JST-GH mating connector, connect directly without a screw terminal. Verify pin assignment with a continuity meter before powering.
Always verify CANH-to-CANH and CANL-to-CANL connectivity with a continuity meter before applying power.
Caution — connector mismatch: a JST-PH4 cable will not mate with the ODrive's JST-GH4 CAN connector (JST-GH has 1.25 mm pitch, JST-PH has 2.0 mm). Source a JST-GH4 cable, or use the connector kit shipped with the ODrive. Do not force a mismatched connector.
4.11. ST-01 — ODrive S1: heartbeat reception
- Requires
- ODrive S1 configured for CAN (see ODrive S1 CAN configuration)
- CAN bus wired and terminated (Option A or B above)
can0interface up at 250 kbps on host:sudo ip link set can0 type can bitrate 250000 sudo ip link set up can0
- Objective
- verify that the ODrive S1 emits CANSimple heartbeat
frames at the configured rate and that
libsvahdecodes them correctly. - Method
Use
candumpin parallel to cross-check raw frames:candump can0 &
Run
svahin no-motion mode with debug logging:svah --interface can0 --axis 0 --no-motion --log-on-stderr --debug
- Observe heartbeat messages on stderr.
- Kill
candump.
- Pass criterion
svahreceives at least one heartbeat within the default timeout (2000 ms) and exits 0.- Heartbeat rate visible in
candumpoutput (~10 Hz, i.e. one frame every ~100 ms on CAN ID 0x001). - No ODrive error flags reported (
error flags: 0x00000000).
- Expected svah output
svah VERSION — iface: can0 bitrate: 250000 bps axis: 0 [svah INFO] HalCanInit: opened can0 (...) svah: requesting IDLE on axis 0... svah: axis 0 is IDLE (error flags: 0x00000000) svah: --no-motion — done
4.12. ST-02 — ODrive S1: IDLE state transition
- Requires
- ST-01 passed; same hardware setup.
- Objective
- verify that
svahcan command the ODrive S1 to enter AXIS_STATE_IDLE and receive the confirming heartbeat. - Method
svah --interface can0 --axis 0 --no-motion --log-on-stderr
- Pass criterion
- exit status 0; output shows
axis 0 is IDLE; no error flags. - Distinguishes from PI tests
- a real ODrive controller responds
to
SET_AXIS_STATEwith its actual firmware state machine. The confirming heartbeat is generated by the ODrive firmware, not bysvahsim. Timing and error flags reflect the real hardware.
4.13. ST-03 — State transition: closed-loop control
- Requires
- motor calibrated
- Method
- extend
svahwith--state closed-loopoption (future). Send position setpoint 0.0 turns; verify encoder estimates return to 0.0 ± 0.01 turns within 2 s. - Pass criterion
- position settled; no ODrive error flags.
4.14. ST-04 — DBC cross-validation (future)
See FutureResearch.org entry on DBC cross-validation.
Write a script that encodes each CANSimple message with known
inputs and compares the resulting payload against the signal
definitions in the ODrive .dbc file for the target firmware
version.
5. Test Infrastructure
5.1. make check target
The check_PROGRAMS automake variable builds and runs unit tests.
Each test program exits with status 0 on success, non-zero on
failure. Integration tests check for vcan0 availability and
exit 77 (automake skip code) if absent.
5.2. Test result summary
| Test | Level | Status | Since |
|---|---|---|---|
| UT-01 | unit | PASS | 0.2.3 |
| UT-02 | unit | PASS | 0.2.3 |
| UT-03 | unit | PASS | 0.2.3 |
| UT-04 | unit | PASS | 0.2.3 |
| UT-05 | unit | PASS | 0.2.3 |
| UT-06 | unit | PASS | 0.2.3 |
| UT-07 | unit | PASS | 0.2.3 |
| UT-08 | unit | PASS | 0.2.3 |
| UT-09 | unit | PASS | 0.2.3 |
| UT-10 | unit | PASS | 0.2.3 |
| UT-11 | unit | PASS | 0.2.5 |
| UT-12 | unit | PASS | 0.2.6 |
| UT-13 | unit | PASS | 0.2.6 |
| UT-14 | unit | PASS | 0.2.6 |
| UT-15 | unit | PASS | 0.2.6 |
| UT-16 | unit | PASS | 0.2.6 |
| IT-01 | integration | PASS | 0.2.3 |
| IT-02 | integration | PASS | 0.2.3 |
| IT-03 | integration | PASS | 0.2.3 |
| IT-04 | integration | PASS | 0.2.3 |
| IT-05 | integration | PASS | 0.2.3 |
| IT-06 | integration | PASS | 0.2.6 |
| IT-07 | integration | PASS | 0.2.6 |
| IT-08 | integration | PASS | 0.3.2 |
| IT-09 | integration | PASS | 0.3.3 |
| ST-01 | system | ready (ODrive S1) | 0.3.25 |
| ST-02 | system | ready (ODrive S1) | 0.3.25 |
| ST-03 | system | future | |
| ST-04 | system | future | |
| PI-01 | physical | PASS | 0.3.14 |
| PI-02 | physical | PASS | 0.3.14 |
| PI-03 | physical | PASS (config A+B) | 0.3.22 |
| PI-04 | physical | planned | future |
| PI-05 | physical | PASS (System B) | 0.3.24 |
| PI-06 | physical | executed — criterion updated | 0.3.25 |
6. Physical Integration Tests (two-node CAN bus)
These tests validate libsvah across a real CAN bus connecting two
independent GNU/Linux hosts. No ODrive motor controller is required:
one host runs svahsim (ODrive emulator) and the other runs svah
(host application). The CAN bus is the only communication path
between the two machines.
Category: Physical Integration (PI)
This category sits between the virtual integration tests (IT, vcan0) and the system tests against real ODrive hardware (ST). It validates:
- Physical layer: driver loading, bitrate configuration, termination
- No loopback artefacts: frames cross a real differential bus
- Real timing: propagation delay, bit stuffing, bus arbitration
- Inter-host independence: no shared kernel, no shared address space
6.1. Hardware configuration
| Item | System A | System B |
|---|---|---|
| Host | PC x86 | PC x86 |
| CAN adapter | DSD TECH SH-C31A | ODrive USB-CAN Adapter |
| Adapter chipset | Canable 2.0 (UCAN) | UCAN (same protocol) |
| Kernel driver | gs_usb |
gs_usb |
| Interface name | can0 |
can0 |
| Connector | Screw terminals | Screw terminals |
| Termination | JP1 jumper (120 Ω) | Internal (120 Ω) |
| Role in PI-01/PI-02 | svahsim |
svah |
Both adapters use the same gs_usb kernel driver and appear as a
standard SocketCAN can0 interface. The procedure is therefore
identical on both hosts.
6.2. Wiring diagram
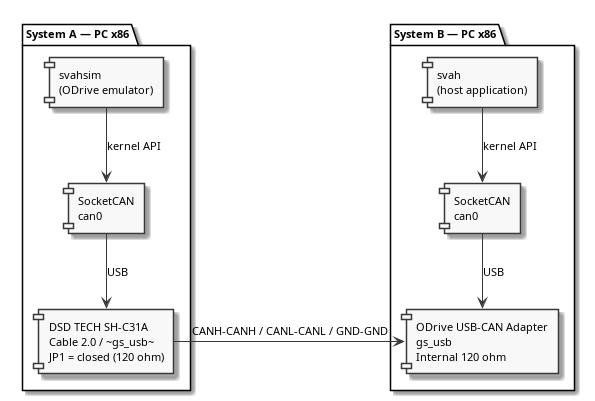
Termination note: a two-node bus requires one 120 Ω resistor at each end. The DSD TECH SH-C31A has two white slide switches; termination is enabled by lowering the right-hand switch (when facing the screw terminal block). The ODrive USB-CAN Adapter has a single black sliding switch; termination is enabled by pushing it toward the screw terminal block. Both must be enabled. If a scope is available, verify the bus idle voltage: CANH ≈ 2.5 V, CANL ≈ 2.5 V, differential ≈ 0 V at idle; ≈ 2 V during a dominant bit.
The photographs below show the actual wiring and switch positions used for PI-01 and PI-02.
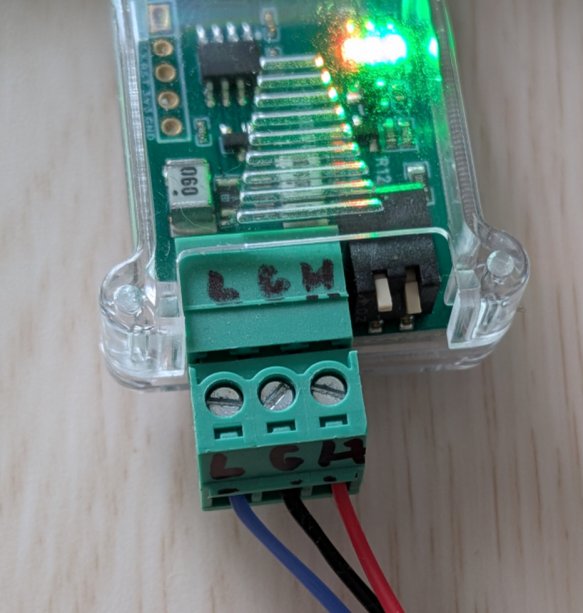
Figure 1: DSD TECH SH-C31A — bornes L (CANL), C (GND), H (CANH) et switches blancs (JP1)
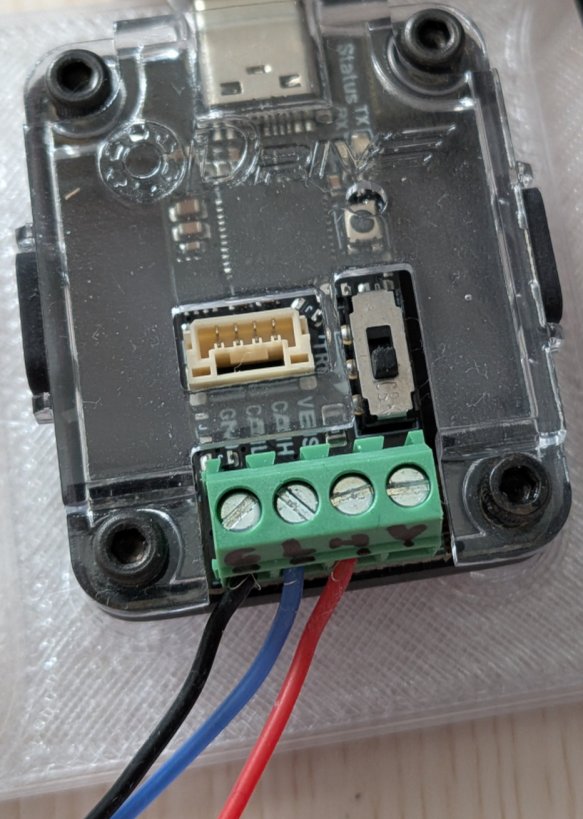
Figure 2: ODrive USB-CAN Adapter — bloc 4 bornes (GND/CANH/CANL/shield) et switch noir de terminaison
Wiring colour code in both photographs: red = CANH, blue = CANL, black = GND. This colour code is not part of any standard; always verify wire assignment with a continuity meter before powering the bus.
Wiring: CAN 2.0B (ISO 11898-2) uses a differential pair — CANH and CANL are the two signal wires and form one twisted pair. GND is a third conductor, not part of the twisted pair. Use a 3-conductor cable: one twisted pair for CANH/CANL (the twist reduces common-mode noise) plus one additional straight wire for GND. A practical option is a CAT-5 cable using one pair (e.g. blue/white-blue) for CANH/CANL and one wire of a second pair (e.g. orange) for GND.
Connect CANH to CANH, CANL to CANL, GND to GND. Verify wire assignment with a continuity meter before powering the adapters. At 250 kbps this wiring is adequate up to several metres.
6.3. RPi 4 with Waveshare RS485 CAN HAT (B) setup
This section documents the setup of a Raspberry Pi 4 Model B with the Waveshare RS485 CAN HAT (B), used as System A or B in PI-03 (heterogeneous platform test).
Hardware: Waveshare RS485 CAN HAT (B) — SPI-connected MCP2515 CAN controller with 16 MHz oscillator. See: https://www.waveshare.com/wiki/RS485_CAN_HAT_(B)
6.3.1. Step 1 — Edit /boot/firmware/config.txt
Add the following three lines at the end of the file:
dtparam=spi=on dtoverlay=mcp2515-can0,oscillator=16000000,interrupt=25,spimaxfrequency=1000000 dtoverlay=sc16is752-spi1,int_pin=24
Reboot:
sudo reboot
6.3.2. Step 2 — Verify HAT initialisation
After reboot, verify the HAT is recognised:
dmesg | grep -i '\(can\|spi\)'
Expected output (MCP2515 successfully initialised):
[ 6.795091] CAN device driver interface [ 6.994204] mcp251x spi0.0 can0: MCP2515 successfully initialized.
The photograph below shows the HAT mounted on the RPi 4, with
the CAN0 terminal block (top-left), the 120 Ω termination jumper
(120R), and the CAN wiring.
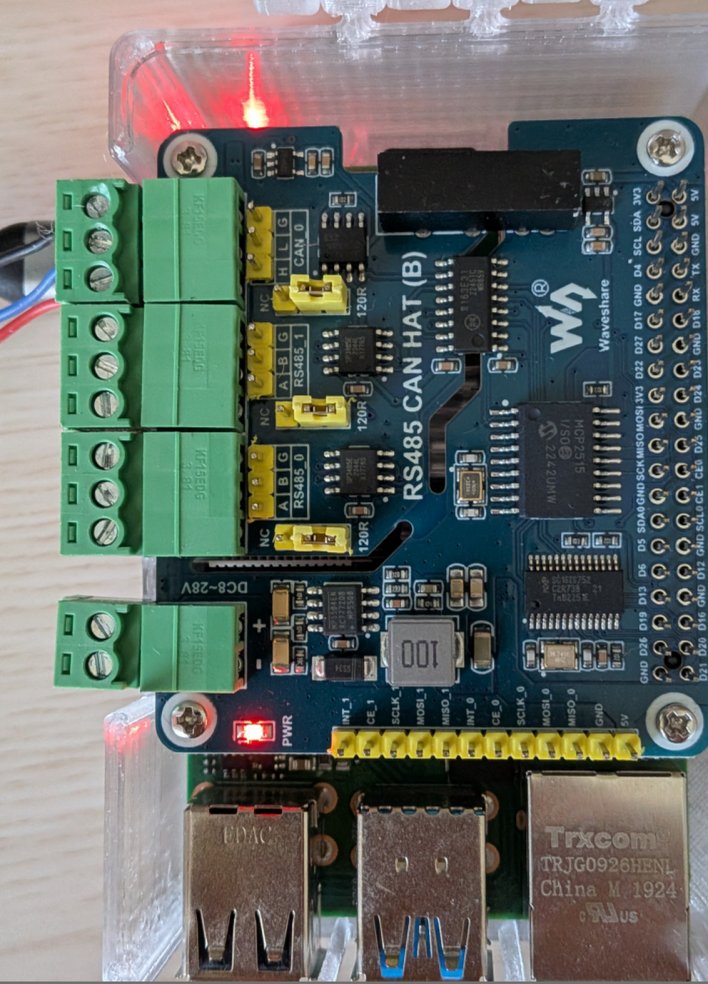
Figure 3: Waveshare RS485 CAN HAT (B) on RPi 4 — CAN0 terminal block, 120R termination jumper, and wiring
6.3.3. Step 3 — Bring up the CAN interface
sudo ip link set can0 up type can bitrate 250000 ip link show can0
Expected:
3: can0: <NOARP,UP,LOWER_UP,ECHO> mtu 16 qdisc pfifo_fast state UP mode DEFAULT group default qlen 10
Note: the ip link set command on the RPi uses a different argument
order than on a USB-CAN adapter. The type can bitrate clause must
be specified. The interface does not need sudo ip link set can0 type
can bitrate 250000 as a separate command first.
6.4. Setup procedure for x86 hosts
Execute the following steps on both x86 hosts unless noted otherwise.
6.4.1. Step 1 — verify the adapter appears
Plug the USB adapter in. Verify the kernel recognised it:
lsusb | grep -i "canable\|gs_usb\|1d50:606f\|0483:5740" dmesg | tail -5 | grep -i "can\|usb"
The DSD TECH SH-C31A and the ODrive USB-CAN Adapter both enumerate
as USB VID:PID 1d50:606f (GS_USB protocol). If neither pattern
matches, load the driver manually:
sudo modprobe can sudo modprobe can_raw sudo modprobe gs_usb
6.4.2. Step 2 — bring up the CAN interface
ODrive USB-CAN Adapter (standard SocketCAN):
sudo ip link set can0 type can bitrate 250000 sudo ip link set up can0 ip link show can0
Expected output:
can0: <NOARP,UP,LOWER_UP,ECHO> mtu 16 qdisc pfifo_fast state UP
mode DEFAULT group default qlen 10
link/can
DSD TECH SH-C31A (slcand must have been run first, see Step 1):
sudo ip link set can0 type can bitrate 250000 sudo ip link set up can0 ip link show can0
Expected output:
can0: <NOARP,UP,LOWER_UP> mtu 16 qdisc pfifo_fast state UP
      mode DEFAULT group default qlen 10
      link/can
The bitrate 250000 must be identical on both hosts.
6.4.3. Step 3 — verify physical connectivity with cansend / candump
On System B (receiver):
candump can0
On System A (sender):
cansend can0 001#DEADBEEF
System B must display the frame. If it does not:
- Check CANH/CANL are not swapped.
- Verify both termination resistors are installed (measure 60 Ω between CANH and CANL with both adapters connected but powered off — two 120 Ω resistors in parallel).
- Verify the bitrate matches on both sides.
- Check
ip -s link show can0for RX/TX error counters.
Pass criterion for Step 3: frame appears on System B candump output within 100 ms of cansend.
6.5. PI-01 — Two-host svahsim / svah: IDLE transition
- Requires
- physical CAN bus up and verified (see Hardware configuration and Steps 1–3)
- Objective
- validate the full
libsvahstack (HalCan → CanopenSimple → OdriveApi) across a real CAN bus, with no shared kernel between the two hosts. - Method
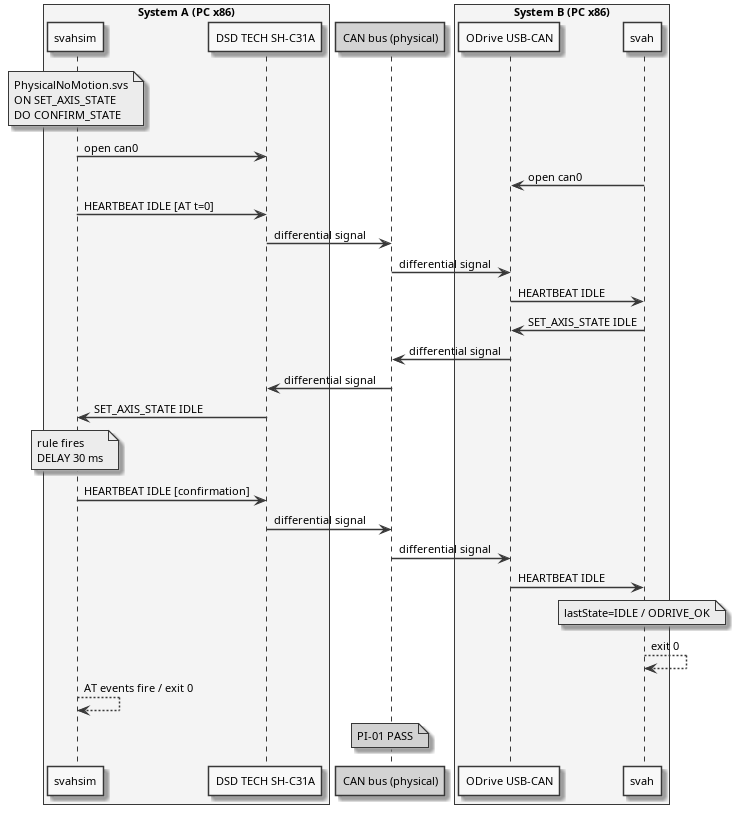
PhysicalTestdrives both sides of the test. On System A, it launchessvahsimwithPhysicalNoMotion.svs, which declares anON SET_AXIS_STATE DO CONFIRM_STATErule and emits heartbeats for 1.5 s. On System B, it launchessvah --no-motion, which requestsAXIS_STATE_IDLEand exits 0 once the confirming heartbeat is received.System A (start first):
./PhysicalTest --role sim --interface can0
System B (start after System A prints its ready message):
./PhysicalTest --role app --interface can0
- Pass criterion
PhysicalTest --role appexits 0 on System B;PhysicalTest --role simexits 0 on System A.
6.5.1. Sequence diagram
6.6. PI-02 — Two-host timing: watchdog feed
- Requires
- physical CAN bus up; PI-01 passed.
- Objective
- validate that periodic frames emitted by
svahsimon System A arrive at System B with sufficient regularity to satisfyOdriveSetAxisState's polling loop within the 2 s timeout. This exercises timing that vcan0 cannot reproduce (vcan0 has zero propagation delay and no bus arbitration). - Method
same as PI-01 but with an extended timeout on System B.
PhysicalNoMotion.svsemits heartbeats at 100 ms intervals; the 2 s timeout gives 20 heartbeat opportunities.System A (start first):
./PhysicalTest --role sim --interface can0
System B:
./PhysicalTest --role app --interface can0 --timeout 2000
Monitor bus load on either host while the test runs:
canbusload can0@250000
- Pass criterion
PhysicalTest --role appexits 0; no timeout errors in syslog.- Distinguishes from IT-09
- propagation delay, bit stuffing overhead, and USB scheduling jitter on the physical bus make the timing non-trivial. Success confirms the timing budget is adequate for real deployment.
6.6.1. canbusload output interpretation
The canbusload can0@250000 command reports bus utilisation. The
columns are: interface, frames/s, total bits/s, payload bits/s,
error frames, bus load %.
Typical output during PI-02:
can0@250000     0       0      0      0   0%
can0@250000     3     375    168      0   0%
can0@250000    12    1470    648      0   0%
can0@250000     0       0      0      0   0%
Interpretation:
- First line
- bus idle before the test starts.
- Second line
- svahsim emitting periodic heartbeats (
HB_RATE 10, i.e. 3 frames per measurement interval at ~100 ms each). - Third line
- peak activity — heartbeats plus
SET_AXIS_STATEfrom svah plus the confirming heartbeat from svahsim. 12 frames/s, 1470 bits/s total, 648 bits/s payload. Bus load: 1470/250000 < 1%. - Fourth line
- test complete, bus idle again.
Conclusion: the CAN bus is virtually unloaded during the test. The 250 kbps bandwidth is more than adequate; the timing budget is dominated by USB latency and scheduling jitter, not by bus saturation.
6.7. PI-03 — Heterogeneous platform: x86 ↔ ARM (Raspberry Pi)
- Requires
- physical CAN bus; one PC x86 (System A or B); one Raspberry Pi (System B or A); Waveshare 2-ch FD HAT or SBC-CAN01 on the RPi (see FutureResearch.org for setup notes).
- Objective
- validate that
libsvahproduces correct frames on an ARM host and that the Linux/SocketCAN HAL works identically regardless of CPU architecture. Of particular interest: correctness ofmemcpy-based float encoding across endianness and alignment differences, and USB scheduling jitter from the RPi's USB-CAN interface. - Method
same as PI-01 using
PhysicalTest, with the RPi playing one role and the x86 the other.Configuration A — RPi as simulator (System A), x86 as application (System B):
# RPi (System A):
./PhysicalTest --role sim --interface can0
# x86 (System B):
./PhysicalTest --role app --interface can0
Configuration B — x86 as simulator, RPi as application:
# x86 (System A):
./PhysicalTest --role sim --interface can0
# RPi (System B):
./PhysicalTest --role app --interface can0
- Pass criterion
- both configurations pass with both roles on both platforms.
- Minimal environment on ARM target
to run
PhysicalTeston the RPi without a full project checkout, copy the following files:- The
svahsimorsvahbinary (from.libs/after cross-compilation) - The
PhysicalTestscript - The
PhysicalNoMotion.svsscript
The recommended approach is to include test files in the
make installstaging:make -C build-aarch64 install DESTDIR=/tmp/svah-staging # Add test scripts manually: mkdir -p /tmp/svah-staging/usr/local/share/svah cp PhysicalNoMotion.svs /tmp/svah-staging/usr/local/share/svah/ cp PhysicalTest /tmp/svah-staging/usr/local/bin/ rsync -av /tmp/svah-staging/usr/local/ pi@raspberrypi:/usr/local/ ssh pi@raspberrypi 'sudo ldconfig'
Then on the RPi, set
SVAHorSVAHSIMif the binaries are not in/usr/local/bin:export SVAHSIM=/usr/local/bin/svahsim PhysicalTest --role sim --interface can0
- The
- (no term)
Results (2026-04-20, RPi 4 Model B + Waveshare RS485 CAN HAT (B)):
Configuration A — ARM (svahsim) ↔ x86 (svah):
ARM: svahsim PASS (1/1 assertions satisfied)
x86: svah 0.3.21.65 — PASS (svah exited 0)
Configuration B — x86 (svahsim) ↔ ARM (svah):
x86: svahsim PASS (1/1 assertions satisfied)
ARM: svah 0.3.21.65 — PASS (svah exited 0)
Both configurations PASS. The
memcpy-based float encoding is correct on ARM (little-endian, same as x86). The MCP2515 SPI HAL introduces no frame corruption within the 2 s timeout budget.- Status
- PASS (both configurations, 2026-04-20, RPi 4 running GNU/Linux Debian trixie 13.4).
6.8. PI-04 — Error injection: svahsim injects axis error
- Requires
- physical CAN bus; PI-01 passed.
- Objective
- validate that
svahdetects and reports an ODrive error condition injected bysvahsim, and exits with a non-zero status. - Method
a dedicated
.svsscript emits a heartbeat with a non-zero error field before responding toSET_AXIS_STATE.svahmust detect the error flag in the heartbeat and report it../PhysicalTest --role sim --interface can0 --script ErrorInjection.svs ./PhysicalTest --role app --interface can0
- Pass criterion
svahexits non-zero and logs the error flags;svahsimexits 0.- Status
- planned; requires
ErrorInjection.svsto be adapted for the physical test scenario.
6.9. PI-05 — Bus disruption: cable disconnect during operation
- Requires
- physical CAN bus; PI-01 passed.
- Objective
- validate that
svahdetects a bus interruption (cable pulled) and exits withODRIVE_ERR_TIMEOUT, without hanging indefinitely. - Method
- Start System A (
svahsim) normally. - Start System B (
svah --timeout 2000). - Disconnect the CAN cable approximately 500 ms after System B starts (after the first heartbeat is received but before the confirming heartbeat).
- Observe exit codes and syslog on System B.
- Start System A (
- Pass criterion
svahexits non-zero withintimeout + 200 ms; syslog shows a timeout error; no hang.- Script
use
LongCycle.svs(60 s duration) to give the operator sufficient time to disconnect the cable:System A:
./PhysicalTest --role sim --interface can0 --script LongCycle.svs
System B:
./PhysicalTest --role app --interface can0 --timeout 2000 --hold 60
The
--hold 60keepssvahon the bus for 60 s after the IDLE transition, polling heartbeats. Disconnect the CAN cable approximately 5 s after System B starts;svahexits non-zero when the next heartbeat times out.- (no term)
Results (2026-04-20, x86 sim ↔ ARM app):
System A (x86, svahsim,
LongCycle.svs):svahsim 0.3.24.72 — iface: can0 axis: 0 svahsim: running script 'LongCycle.svs' (play mode) [svah ERROR] HalCanReceive: read() failed: No such device [svah ERROR] HalCanTransmit: write() failed: No such device or address ... svahsim: PASS (play mode — no assertions)
System B (ARM, svah,
--hold 60):svah 0.3.24.72 — iface: can0 bitrate: 250000 bps axis: 0 svah: requesting IDLE on axis 0... svah: axis 0 is IDLE (error flags: 0x00000000) svah: --no-motion — done svah: --hold 60 — monitoring bus for 60 s svah: disconnect the CAN cable now to test bus disruption [svah ERROR] OdriveWaitHeartbeat: timeout [svah ERROR] svah: bus disruption detected — heartbeat timeout (-2) svah: bus disruption detected — heartbeat timeout PhysicalTest: FAIL — svah exited 1
- (no term)
- Behaviour notes:
svahexits non-zero as expected when the cable is disconnected during the hold window. PI-05 PASS from System B's perspective.svahsimcontinues running until allATevents inLongCycle.svshave fired (60 s). This is nominal in play mode: the script has noEXPECTassertions, so svahsim has no way to detect the cable disconnect and runs to completion. TheHalCanReceive/HalCanTransmiterrors on System A are diagnostic messages from failed I/O after the adapter is removed by the kernel.
- Status
- PASS (System B, 2026-04-20). svahsim play-mode behaviour on cable disconnect documented above.
- (no term)
Symmetric detection (0.3.30): the play-mode limitation above is now optional. To have the simulator side also detect the disconnect and exit non-zero, either run an assertion-mode script with
EXPECT CONNECTED WITHIN N(BusWatch.svs), or add--bus-timeout Nto any script invocation:# Assertion-mode simulator side: ./PhysicalTest --role sim --interface can0 --script BusWatch.svs # or wrap the play-mode script with a timeout: svahsim --interface can0 --bus-timeout 2000 LongCycle.svs
With either, System A exits non-zero on disconnect, making PI-05 symmetric. See
SimScriptLanguage.orgfor the directive and option.
6.10. PI-06 — Bitrate mismatch detection
- Requires
- physical CAN bus; two adapters with independently configurable bitrates.
- Objective
- validate that configuring one host at 250 kbps and
the other at 500 kbps produces bus errors detectable via
ip -s link show can0(error counters) and that neither host hangs. - Method
# System A: 250 kbps (correct)
sudo ip link set can0 type can bitrate 250000
sudo ip link set up can0
./PhysicalTest --role sim --interface can0

# System B: 500 kbps (intentionally wrong)
sudo ip link set can0 type can bitrate 500000
sudo ip link set up can0
./PhysicalTest --role app --interface can0
- (no term)
- Observed behaviour (2026-04-20):
- System A (x86, 250 kbps)
svahexits non-zero (timeout).ip -s link show can0shows zero CAN errors on System A. Reason: the x86 transmits correctly at 250 kbps; the ARM frames at 500 kbps are not valid CAN frames at 250 kbps and are ignored by the x86 controller.- System B (ARM, 500 kbps)
- repeated
HalCanTransmit: write()
       failed: No buffer space available
. The MCP2515 enters error-passive or bus-off state because its 500 kbps frames cannot be acknowledged on a 250 kbps bus. The TX queue fills up.
- Pass criterion
svahexits non-zero on System A; System B produces TX errors indicating bus-off. Neither host hangs.- Note on adapter behaviour
- the MCP2515 (RPi Waveshare HAT)
enters bus-off after sustained errors. The USB-CAN adapters using
gs_usbon the x86 side remain operational. After the test, restart the ARM interface:sudo ip link set can0 downthensudo ip link set can0 up. - Status
- executed 2026-04-20; results documented above.
7. Test Infrastructure Details
7.1. vcan0 interface setup
The vcan0 virtual CAN interface is required for all integration
tests IT-01 through IT-09. It is provided by the vcan kernel
module and has no hardware dependency.
7.1.1. Temporary setup (current boot only)
sudo modprobe vcan
sudo ip link add dev vcan0 type vcan
sudo ip link set up vcan0
The interface disappears on the next reboot.
7.1.2. Permanent setup
Two methods are available. Choose one.
7.1.2.1. Method A — systemd-networkd
This is the recommended method on systems running
systemd-networkd. It requires three files: one to load the
kernel module, one to create the virtual device, and one to bring
it UP. Without the third file (.network), systemd-networkd
creates vcan0 but leaves it DOWN.
Step 1 — load the module at boot:
echo "vcan" | sudo tee /etc/modules-load.d/vcan.conf
Step 2 — create the virtual device:
sudo tee /etc/systemd/network/10-vcan0.netdev << 'NETDEV'
[NetDev]
Name=vcan0
Kind=vcan
NETDEV
Step 3 — configure the interface (brings it UP):
sudo tee /etc/systemd/network/10-vcan0.network << 'NETWORK'
[Match]
Name=vcan0

[Link]
RequiredForOnline=no

[Network]
LinkLocalAddressing=no
NETWORK
Step 4 — enable and restart networkd:
sudo systemctl enable systemd-networkd
sudo systemctl restart systemd-networkd
Verify that vcan0 is UP:
ip link show vcan0
# Expected: <NOARP,UP,LOWER_UP> ...
Diagnosis: if the interface appears but is DOWN after reboot,
the .network file is missing or not matching. The syslog will
show vcan0: netdev ready (device created) but no Link UP
message. Add the 10-vcan0.network file and restart
systemd-networkd.
7.1.2.2. Method B — rc.local via systemd
The /etc/rc.local mechanism is obsolete on modern systemd
systems but can be activated explicitly. It requires a
rc-local.service unit file, which may or may not be present.
Step 1 — create /etc/rc.local if absent:
sudo tee /etc/rc.local << 'EOF'
#!/bin/sh -e
modprobe vcan
ip link add dev vcan0 type vcan
ip link set up vcan0
exit 0
EOF
sudo chmod +x /etc/rc.local
Step 2 — create the systemd unit that runs rc.local (required on Ubuntu 20.04+ and Debian 10+ where the unit is absent by default):
sudo tee /etc/systemd/system/rc-local.service << 'EOF'
[Unit]
Description=/etc/rc.local
ConditionPathExists=/etc/rc.local
After=network.target

[Service]
Type=forking
ExecStart=/etc/rc.local start
TimeoutSec=0
StandardOutput=tty
RemainAfterExit=yes

[Install]
WantedBy=multi-user.target
EOF
sudo systemctl enable rc-local
sudo systemctl start rc-local
Note: Method A (systemd-networkd) is cleaner and does not require maintaining a legacy compatibility shim. Use Method B only when Method A is not applicable (e.g. the system uses a different network manager).
7.2. Required packages for building and testing
The following packages are needed on Ubuntu/Debian:
| Package | Purpose | Required for |
|---|---|---|
gcc, make |
C11 compiler, GNU Make | Building |
autoconf, automake |
autotools | Bootstrap |
libtool, libtool-bin |
shared library | Bootstrap |
libreadline-dev, libncurses-dev |
readline | svahsim interactive mode |
emacs-nox |
Org-mode exporter | Documentation (PDF/HTML) |
plantuml |
Diagram generation | Documentation (PDF/HTML) |
texlive-luatex |
lualatex engine | PDF export |
fonts-noto |
Noto fonts (Devanagari) | PDF export of Concept.org, ResearchJournal.org |
texlive-latex-extra, texlive-fonts-recommended |
LaTeX packages | PDF export |
can-utils |
slcand, candump, cansend |
DSD adapter; connectivity tests |
Install all at once:
sudo apt install gcc make autoconf automake libtool libtool-bin libreadline-dev libncurses-dev can-utils
Documentation build only:
sudo apt install emacs-nox plantuml texlive-latex-extra texlive-fonts-recommended
7.3. automake parallel test harness files
Each test program executed by make check produces two files in the
build directory:
TestName.log- Standard output and standard error of the test program, captured by the automake test harness. Contains the full test output (individual test names, PASS/FAIL lines, results summary). Useful for diagnosing failures.
TestName.trs- Machine-readable test result file in the
Test Result Summary format used by automake. Contains one line
per test:
:test-result: PASS,:test-result: FAIL, or:test-result: SKIP. Read by automake to build thetest-suite.logsummary. test-suite.log- Overall test summary produced by automake. Contains the result counts (TOTAL / PASS / SKIP / FAIL) and concatenates the output of any failed test programs.
These files are removed by make clean (they are in CLEANFILES).
The automake skip code is 77: a test program that exits with
status 77 is reported as SKIP, not FAIL. This is used by
TestHalCanLinux and TestSvah when vcan0 is absent.
8. Glossary
- CAN
- Controller Area Network — differential serial bus protocol standardised as ISO 11898. Used by the ODrive controller for the CANSimple protocol.
- CANSimple
- ODrive's proprietary application-layer protocol over
CAN 2.0B. Each message encodes an axis node id and a command id in
the 11-bit CAN identifier; payload is raw C types copied by
memcpy. - DLC
- Data Length Code — the 4-bit field in a CAN frame header indicating the number of payload bytes (0 to 8). Not to be confused with Data Link Control, which is an unrelated concept.
- RTR
- Remote Transmission Request — a CAN frame with the RTR bit
set and DLC = 0, sent to request a data frame from another node.
Used by
svahto request encoder estimates (OdriveRequestEncoderEstimates). - SocketCAN
- the CAN subsystem of the Linux kernel. Exposes CAN
interfaces as network devices (
can0,vcan0) accessible via BSD socket API (PF_CAN,SOCK_RAW,CAN_RAW). - vcan
- virtual CAN — a SocketCAN network driver that creates a loopback CAN interface with no physical hardware. Used for integration tests IT-01 to IT-09.
gs_usb- Linux kernel driver for USB-CAN adapters implementing
the
GS_USBprotocol (USB VID:PID 1d50:606f). Supports the DSD TECH SH-C31A (Canable 2.0) and the ODrive USB-CAN Adapter. - HAL
- Hardware Abstraction Layer — the
HalCan.h/HalTime.hinterface inlibsvah, separating the portable protocol codec from platform-specific CAN drivers. - BLDC
- Brushless DC motor — the class of motor controlled by the ODrive. Requires a commutation controller (Field-Oriented Control) not present in a simple DC drive.